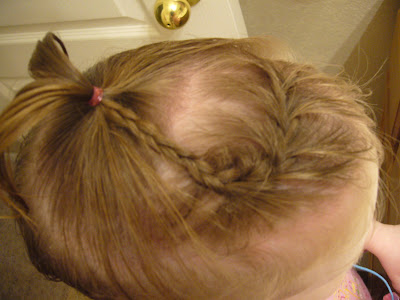
It just reminded me of his hairstyle for some reason...that's why the Paul Revere name. Begin by parting her hair down the middle from the forehead to the neck. Secure one side with a clip to keep it out of the way. With the other side, secure a small section of hair close to the forehead with an elastic. Using this ponytail as one of the braid strands, loosely French braid the rest of the hair on that side and secure at the end with an elastic. Do the same on the other side. At this point you could consider yourself finished, but to create this hairstyle I combined the 2 ends and secured with an elastic right at the base of her head. I then removed the other 2 elastics, combed out the ponytail, and added an elastic.
Friday
Wednesday
Hidden Braid
I saw this one in a hairstyle magazine and decided to try it out on my 6-year old. The photo isn't great, but the hairstyle is perfect for getting those wispy bangs out of the way. Section off a small amount of hair close to the forehead. It should be a section that extends from temple to temple but is only about an inch wide. Comb it to one side and Frend braid it, securing with an elastic. Using bobby pins, secure the end of the braid under the rest of her hair, hiding it from view. If the resulting bump is too big for you, remove the elastic once you have secured it with bobby pins. Simple, but sweet!
Saturday
Squared Off
Okay...I had to chase after her to get a photo of this one, and I had the flash on by accident, and she flat out refused to let me get another photo. It really was cute even though the photo doesn't do it justice! I began this one with a simple flip under. I squared off a section right behind the flip-under. Next, I sectioned the large square into 4 smaller ones by parting down the middle in both directions. Taking half of the hair from the flip-under, I added it to the section immediately behind it and secured with an elastic. I did the same with the other side. I added each resulting ponytail to the remaining sections and secured with elastics creating 2 final ponytails. I think she was literally running away from me at this point, so no chance to dress it up, but cute clips or ribbons would finish it off nicely!
Tuesday
ZigZag Rope Ponies
A while back I posted how to create rope ponies, and this is just a twist on the original. Part her hair down the middle from the forehead to the neck. Secure one side out of the way. With the other side, create 4 sections of hair. To make things easier on yourself, you can create 3 parts horizontally using her ear as your starting point. Starting with the section closest to her forehead, comb the hair slightly towards the center of her head and secure with an elastic. Add this ponytail to the next section of hair, combing slightly more towards the ear, and secure with an elastic. Add that to the next section of hair, combing towards the center of her head and securing with an elastic. Finally, add that ponytail to the last section of hair and secure it closer to the ear. You should have a nice zigzag pattern. Repeat these steps with the other side of her hair.
Saturday
the Fan
Begin this hairstyle by sectioning off a square of hair right on top of her head. Comb towards one of the back corners, left or right, and secure with an elastic. Lift up the ponytail and separate the hair below the elastic (the hair closest to the head). Reach through the opening with your comb or finger and twist the ponytail partway through. See my previous instructions on how to do this. When you pull the ponytail through, leave the end of the ponytail fanned out on top of her head, while the part you pulled through creates a curly-q. Dress it up if you like.
Friday
5-Star on the Side
This one is a little different because it is lopsided, but I actually meant for it to look that way. I began by sectioning off a large square of hair on top of her head. I parted the large section from side to side near the back, and though it is difficult to tell from the photo, the part is on a slight downward slant from right to left. Reserve the back section for last. With the large front section, part it down the middle once, then part each of those 2 sections down the middle, making 4 sections total. Comb each section back and fasten with an elastic. The section on the farthest left should be the longest section due to the diagonal sideways slant created earlier, and the section on the farthest right should be the shortest section (from front to back). Gather the 4 tails together with the reserve section of hair, and fasten with an elastic directly behind the 2nd elastic from the right so that the resulting ponytail is off to the side. Add some cute clips or bows or both for a finishing touch.
Saturday
Elegant Twist with Zigzag Part
Begin this hairstyle with a zigzag part. Gather a thin, long section of hair from one side of her face and twist it clockwise all the way to the back of her head. Secure it temporarily with a clip. Do the same on the other side. Remove the clip and combine the 2 section of twisted hair together at the back of her head. Fasten with an elastic. Add a bow. If it seems like the twist will not stay in place, adding a clip to the twist on each side of the elastic also looks nice.
Wednesday
Triple Threat French Braid
If you know how to French braid, this one will be a cinch. Square off a large section of hair on top of her head. Separate into 3 long sections from front to back. French braid each section to the ends and secure with an elastic. Gather the 3 elastics together and secure with a 4th elastic above the other three elastics. Remove the original 3 elastics, comb out the tail, and add a bow.
Friday
Valentine Heart Hairstyle
We had fun coming up with a Valentine hairstyle for school. This is what we ended up with...a heart right on top of her head. I started by parting her hair down the middle. About an inch back from her forehead I pulled a small section of hair from each side of the part into a tiny ponytail, leaving the hair at her forehead out (there was hair all around it that was not in the ponytail, so it looked kind of funny, but it made the inner point of the heart). Beginning on one side of the part, I added the hair closest to the forehead to half of the hair from the first ponytail and fastened with an elastic. The ponytail should be going towards her face at this point. I then added to that another small section of hair from the forehead to the part and fastened with a 3rd elastic, pointing the ponytail the right direction towards the back of her head. I pulled back 1 more small section in the same way, following the part from the 3rd elastic back along her head. Then I repeated the whole process on the other side of the original middle part. When I finished both sides, I pulled up a section at the back, following the part from the 3rd & 4th elastics. I added both ponytails to that section and fastened the whole thing with an elastic, then dressed it up with a bow of her choice. Happy Valentine's Day!
Saturday
Poofy Pullback
I started this hairstyle by sectioning off a long rectangle of hair from the forehead almost to the tip of her head and securing with an elastic. I then sectioned off a long rectangle of hair to the right of that one and fastened it with an elastic. I did the same on the left side of the first ponytail, then did it once more on each side so she ended up with 5 separate small ponytails. To create the curly-q's, I gathered half of the middle ponytail with the 2 ponytails on that side, then added more hair from the top of her head, following the part from the ponytail closest to her ear. I then fastened it all into one elastic and created the curly-q. I did the same thing on the other side and fanned out the ends under the curly-q's for a finishing touch.
Thursday
Simple Twistaway
I needed something simple and quick today just to get her hair out of her eyes. I grabbed a small section of hair at her forehead, twisted it until it was tight against her head, then secured it with one bobby pin. We added the barrettes for some color but they are not holding anything in place. Definitely sweet and simple.
Sunday
Braided Pullback
Begin with a small sideways French braid. Temporarily fasten the end of the braid with an elastic. Gather more hair from the sides and top of head into a ponytail, adding the braid last. Secure with an elastic, then remove the temporary elastic on the braid. Unravel the braid up to where the ponytail is fastened. I tried this with both of my girls. It worked well with the daughter that has thicker, longer hair. It was trickier with my younger daughter who has thin, shorter hair, but I posted pictures of both.
Friday
Small Sideways French Braid
Saturday
Ponies with Side Zig Zag Part
Choose which side you'd like to part her hair on and create a zig zag part. Pull one side into a ponytail and fasten with an elastic. Repeat on the other side. Since my daughter has shorter hair, I don't try to pull all of her hair into the ponies. Dress up with fun bows or clips. Super fast and easy!
Tuesday
Roly Poly
I began this hairstyle by parting her hair down the middle. About an inch back from her forehead, I parted her hair horizontally on each side from the middle part down to her ear. I then separated those 2 large sections into 2 smaller sections. Starting with the sections closest to the middle part, I twisted those sections of hair until they met at the back of her head, where I fastened them with a small elastic. I then took the remaining part on one side, twisted it until it met the others in the back and fastened it to the same ponytail with another small elastic. I repeated the same thing with the remaining part on the other side. I then added a bow of her choice.
Hint: the ponytail and roly-polies shifted around a lot because she is an active little girl, so I used a 4th elastic to add a small amount of hair from directly below the other elastics to secure the ponytail to her head.
Subscribe to:
Posts (Atom)