Friday

Bubbly-Do

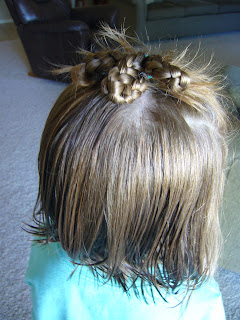
My daughter received lots of compliments on this one, and it was really very simple. I began by parting her hair down the middle all the way to the nape of her neck. I then parted her hair horizontally from ear to ear over the point of her head. For each of the top 2 sections, I fastened them with an elastic and created curly-q's. I spread out the curly-q's for a some character. With the bottom 2 sections, I pulled them each back into ponytails and secured with an elastic. I then used 2 bobby pins on each side to flatten and secure them above the elastic, spreading the hair wide to create a nicely fanned curl. Once her hair dried it looked even better, but we were so busy with Christmas, I didn't get a chance to take a photo. Maybe next time!

Monday

Cornstalks

This style is great for getting hair away from the face yet creating a nice look. First I parted her hair down the middle to the point of her head. I then squared of a section on each side of that part. I then parted those sections into 2 more sections, creating 4 total. Fasten each one with an elastic. From the face, pull back an additional section of hair on each side above the ears. Gather these 2 new sections together with the 4 ponytails, and fasten all of them together in one elastic. Dress up with clips or bows for a nice finished look.

Wednesday

Partial Three-Tie Pony

I've done the three-tie pony before using all of her hair, but this time I wanted to use only part of her hair. I usually try to take a photo with a clear background but she wasn't too happy to have her picture taken today, so this is what I got. First, I parted her hair down the middle and about halfway back to the point of her head. I then gathered a small square section on each side of that part and secured each one with an elastic. I then gathered hair behind those ponies all the way to the point of her head and secured that hair and the 2 original ponies together into one. I then added a simple bow to dress it up.

Friday

Riata Ponies

This one was really fun. Begin by parting the hair down the middle, all the way to the nape of the neck. You can do a zig-zag part if you feel really creative. On one side, part the hair from the point of the head to the ear and fasten the front section with an elastic. Braid the resulting ponytail and secure with another elastic. Comb the remaining hair on that side into a ponytail, add the braid, and secure both together with another elastic. Do the same with the other side, then dress up with a bow or some clips. It's that easy!

Monday

Barbells

I couldn't call them dumbells, right? :-)
First I parted her hair down the middle to the point of her head. Then I squared off a section on each side. Then I parted each of those sections down the middle, fastening the 2 closest to the original part with separate elastics. To each of those I added to rest of the hair from each section and fastened each with separate elastics. They do kinda look like barbells, don't they? Simple!

Thursday

Partial Princess Crown

My older daughter has very thick hair, so the full princess crown would not work on her hair as well. We went with a partial crown instead. I parted her hair in the middle only to the point of her head. Starting on one side, I squared off a large section of hair. I then gathered a small section at the forehead and fastened it with an elastic. I then added the first section to a second small section right behind it and fastened with an elastic. I did this several times until I reached the point of her head. With each elastic I fastened it slightly closer to the part so that by the time I reached the last one, it was fastened right next to the part. I then did the same thing to the other side. I fastened the two tails together at the point of her head, then twisted the resulting ponytail over and through itself. I then added a bow.
Hint: If you don't like trying to tie a perfect bow every time, tie your ribbons into bows and then add them to the hairstyle with a bobby pin.

Saturday

Full Princess Crown

My girls love to be princesses and the more elastics I use, the better... in their opinion. For the younger daughter who has wispy, fine hair I decided to use almost all of her hair to create a "crown" on her head. I started with a short side part from the point of her head to her forehead. I gathered a small section of hair using the point of her head as the center and put an elastic in. I then gathered another small section right next to the first, added the first section and fastened with another elastic. I continued doing this all the way around her head until I came to the back of her head. Then I began back at the beginning, but on the other side of the original part, doing the same thing I had done on the other side of her head until I reached the back of her head. Then I fastened the 2 tails together. Add bows or clips to dress it up if you like.

Wednesday

Waves

Waves of ponies, that is. Square off a large section of hair on top of her head. Separate it into 3 narrower sections. Secure on the side with 3 separate elastics. Add clips or bows to spruce it up. This works especially well with thick hair.

Monday

Slanted Two-Tie

Comb most of the hair into a section, leaving some around the sides and back. Part the large section of hair diagonally from left to right corners or vice versa. Secure the section closest to the forehead with an elastic to make a pony. Add this pony to the other half of the section and secure with a 2nd elastic. As you can tell, this is my wiggly child...she loves to have pretty hair but doesn't love the camera!

Wednesday

Zig Zag Underbraids

Begin this one with a zig zag part, but continue all the way to the nape of the neck. Put one side in a butterfly clip to keep out of the way. Start the underbraid at the forehead with a small section of hair parted from the ear to the center part. Separate this small section into 3 smaller sections. Holding on to all 3, pull the leftmost section under the middle one (making it the new middle section), then the rightmost section under the middle one. This begins the braid. Begin adding hair to each section as you pull it under; add more hair to the leftmost section and pull it under the middle one, add more hair to the rightmost section and pull it under the middle one, and so on until you complete the braid. You can end at the nape of the neck or go to the end of the hair. Do the same on the other side, then dress it up with some clips or ribbons.

Tuesday

Quick Pull Back

Today I just needed something fast to get her hair out of her eyes. If you have a child with wispy hair, you know what I mean. I didn't try to make a straight part, but started by pulling her front hair back into a small pony. I split that pony into 2 sections, then added more hair to each to make 2 more ponies. Then I added more hair to each of those 2 ponies. It was quick and simple, and kept her hair off her face.

Monday

Petal Braids

I loved this idea, and tried it out as soon as I had a chance. Do this style just like the rope ponies, with a little difference. Begin by parting down the middle. Instead of parting the smaller sections from the ear, part from the middle center. Secure each section of hair, adding the previous section to it. Do the same on the other side of the head. I ended with 2 separate ponies, but you can combine them if your child's hair is long enough.

Tuesday

Zig-Zag Stack


Square off a section of hair on top of her head. Create a zig-zag part. Using the zig-zag part, separate the section into 2 ponytails, and secure each with elastics. To each ponytail, add more hair surrounding the original squared off section. Secure with two more elastics (you should have 4 elastics in all). Embellish however you would like...I added decorative bobby pins over each elastic.

Friday

Double Twist

Some days I have more time than others, and some days I just want to get their hair out of their eyes. Today we went with a flip-under on the side first. Take a small section of hair at the forehead and secure with an elastic. Then flip it under (look back at my instructions). Take another small section, add the pony from the first twist, and secure with an elastic. Also flip that one under. It is simple but stylin'.

Saturday

Ziggy Ponies

We wanted ponies today, and this is what we ended up with. I started by pulling a small section of hair at the forehead into an elastic. I split that pony into 2 sections. To each of those sections I added more hair and secured with elastics. I combined those 2 ponies, added a bit more hair, and secured with an elastic. Finally, I split that last pony into 2 sections, added more hair to each, then secured with elastics. My daughter doesn't have long enough hair for regular ponies, so this was a fun way to pull her hair up. As you can see, we left some hanging out since the hair near the nape of her neck is still pretty short (we are working on growing it out so we can do more fun long hair-dos like we used to!)

Sunday

Rope Ponies

This is one of my favorites! It works in all kinds of hair. My daughter has relatively short hair and it is quite thin, but this style keeps her hair away from her face. She has even slept on this hairstyle and it looked great when she woke up in the morning so I didn't feel pressured to get her hair done right away!

Part the hair down the middle starting at the forehead and going all the way to the nape of the neck. Clip one side out of the way. With the other side, beginning at the forehead, pull back the front section of hair and secure with an elastic. Pull that ponytail into the next section of hair and secure with a 2nd ponytail. Continue this until you have used all the hair on that side. Yours may take more or less elastics than mine did. Thicker hair should be done in thinner sections. Repeat this procedure for the other half of the hair. This is a fun style to add pins, clips, or ribbons to if you like.

Cross-Up

Square off a large section of hair on top of the head. Separate into 4 square sections and secure each with an elastic. Pull all 4 ponytails into the middle and secure with a 5th elastic.

Thursday

Braided Pony


This one is simple, but elegant. Create 3 small braids at the front of the hair by squaring off 3 small sections. Braid each section and secure with an elastic about an inch from the end. Pull them forward and out of the way. Comb the hair back into a ponytail (you choose how much hair to pull in, I did about half of her hair). Pull the 3 braids back and lay them on top of the ponytail, then secure the ponytail and braids with one elastic. You can leave it like that, or to create a more finished look if the braids are longer than the ponytail, remove the braid elastics and undo the braid up to the ponytail.

a Curly-Y


Pull 2 sections of hair at the front of the head into ponytails. Add both of those ponytails and more hair (or all the rest of the hair depending on what look you want) to a 3rd elastic. You can either pull it all the way through like a regular ponytail, as in the 2nd photo, or you can make it into a curly-q as in the 1st photo.

Monday

the Crown

To create this, I used 8 tiny elastics. Starting in the middle, at the forehead, I pulled back tiny sections of hair (about 1" square). I started in the middle to make sure they were centered, then did one on each side until I had all 8 elastics in. You can leave the hair like that, or you can pull the rest of the hair into one ponytail for a nice effect.

Friday

Triple Flip-Unders


This is a much cuter hairstyle than it looks from these photos. It was a wiggly day! Square off a section of hair on top of the head. Separate into 3 thin strips (the thinner, the better...I should have gone thinner here). Secure each strip on the same side of the head with 3 elastics. Look back at my flip-under instructions to complete each of the 3 ponytails.

Tuesday

Braid-Ups


To create this look, pull as much hair as you want into a ponytail (I used a squared off section at the top of her head) and secure with an elastic. Separate the ponytail into 3 sections. Braid each section and secure with an elastic about 1-1.5" from the end. Fold braids so that the 3 end elastics meet with the first elastic you put in the hair. Use another elastic to secure the folded braids to the ponytail. Fan out the loose ends.

Saturday

the Ladder

Tiny elastics are so great for doing fun hairstyles. If you don't have any, you might consider stocking up on them. They are inexpensive and disposable. If I can't get them out of my girls' hair, I just cut them out instead to save time and effort.


Today I wanted to use several elastics without doing the same old thing, so I went for a ladder effect. Just square off a section of hair first. Then separate it into thins strips starting at the forehead. Comb the hair to one side and secure with an elastic. Comb the second strip to the opposite side and secure with an elastic. Comb a 3rd strip to the same side as the first one, add the first ponytail, and secure with elastic. Comb the 4th (last) strip to the same side as the 2nd one, add the 2nd ponytail, and secure with an elastic. You could do more depending on what you like.

Wednesday

Curly Q's


These little curly q's can be done several different ways...and you can use as many as you want for one hairstyle. This particular day I chose to put 3 in my younger daughter's hair and 2 in the older one's hair. I put just one in sometimes as well. There are a couple of ways to do these. You can put the hair in a ponytail using an elastic...you choose the size and number of ponytails. Then use a second elastic and pull the ponytail halfway through, tighten, and fan out the loose ends. Or if you want to use just one elastic, I wait until the last loop to pull the ponytail halfway through, tighten, then fan out the loose ends. The nice thing is, you can't go wrong with this...the loose ends can go up, down or sideways, and it still looks adorable!

Thursday

the Big W

When I'm getting ready to do hair for the day, I sometimes ask my girls how many elastics they want or how many barrettes. Today the answer was '5' so this is what we did. I pulled back the front in 3 small sections. Then I split the middle ponytail into 2 sections. Then I made 2 more ponytails using more hair, plus one side ponytail, plus 1/2 of the middle ponytail. When we were done, it looked like a big W, so that's where the name came from...original, huh?

Monday

The Twisted Crown

My girls love this one! It is a fun one to add embellishments to, like little flowers or clips or ribbons or decorative bobby pins.
First, section off a square of hair on top of the head. Part the section down the middle to make 2 sections. Clip one section off to the side while you work on the first section. From the first section, take two small pieces at the forehead and twist them around each other twice. On the third twist, pull another small piece into the twist. On the fourth twist, pull another small piece into the other section you are twisting. Continue repeating this until you've used the entire section. Clip in place or have someone hold it while you do the other side. Once both sides are done, secure with an elastic. There are several things you can do at this point: 1) you can leave it as a small ponytail, 2) you can braid the ponytail, 3) you can continue twisting the ponytail, then fold it in half and secure with a 2nd elastic in the same place as the first elastic.

My girls love to have their hair done the same as one another, so I often find out whether the same hairstyle works for thick/thin or short/long hair. This one definitely works better with thick, long hair! Here's how it looked on thin hair:

Saturday

Sidewinder


Section the hair into a square. Separate into 3 narrow strips. Secure the section closest to the forehead with an elastic on one side. Add the hair from that section to the next section, and secure with an elastic. Repeat for the 3rd section. For thinner hair, the tiny rubber elastics work well, but for thicker hair, the larger elastics hold the hair in place better.

Wednesday

Ziggy

I love this one because it has pizazz! Section of a rectangle of hair. Separate into 4 sections, beginning at the forehead. Secure the 1st section on one side. Add that mini-pony to the next section of hair, and secure with an elastic on the opposite side. Repeat for the 3rd and 4th sections. It's an eye-catcher!
As an added note: I tried this on my other daughter, who has very thick hair. I found that it worked better to use much narrower sections.

Saturday

Triple Twist Combo

Sorry about the lousy photo here, but it's the best I could get before she ran away from the camera! This one is great for wispy hair, especially wispy hair that tends to fall over the eyes if not pulled back. Start with a basic flip-under using a small section of hair and securing with an elastic. Repeat twice, add the hair from the previous flip-under to each one and securing with an elastic. Add a bow for a nice touch.

Tuesday

V-Formation

Using a small section of hair, start this one with a flip-under secured with an elastic. Divide the little pony in half and add more hair to each one to make 2 more mini-ponies. Add ribbons or clips to dress it up a little.